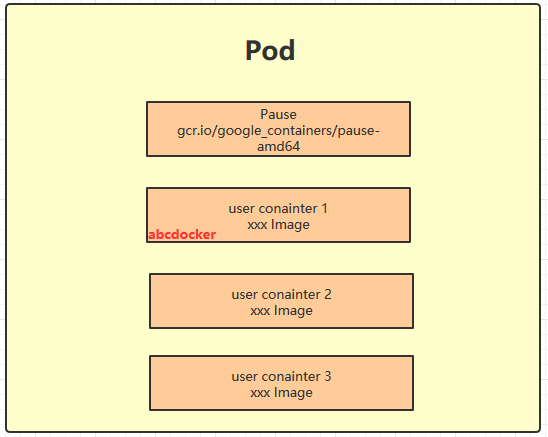
Introduction to Pods
Each Pod contains a special container called the “Pause container.” The image corresponding to the Pause container is part of the Kubernetes platform. In addition to the Pause container, each Pod also includes one or more closely related user business containers.
Why did Kubernetes design a new concept of Pods with such a special structure?
Reason One: The Pause container serves as the root container of the Pod, representing the status of the entire container group. Reason Two: Multiple business containers inside the Pod share the IP of the Pause container and the Volume attached to the Pause container.
Kubernetes assigns a unique IP address, called Pod IP, to each Pod. Multiple containers within a Pod share the Pod IP. Kubernetes requires underlying network support to enable direct communication via TCP/IP between any two Pods within the cluster. This is achieved using virtual layer 2 network technology, allowing containers within a Pod to communicate directly with containers on other hosts.
Static Pods & Regular Pods
Regular Pods:
Once created, a regular Pod is stored in etcd and then scheduled by the Kubernetes Master to a specific Node and bound. Subsequently, the Pod is instantiated into a set of related Docker containers by the kubelet process on the corresponding Node. When a container inside the Pod stops, Kubernetes automatically detects the issue and restarts the Pod (restarting all containers inside the Pod). If the Node where the Pod resides crashes, the Pod will be rescheduled to other nodes.
Static Pods: Static Pods are managed by kubelet and exist only on specific Nodes.
They cannot be managed via the API Server, cannot be associated with ReplicationController (RC), Deployment, or DaemonSet, and kubelet cannot perform health checks on them. Static Pods are always created by kubelet and always run on the Node where kubelet is located.
There are two ways to create static Pods: via configuration files and via HTTP.
- Configuration File Method: Firstly, you need to set the “config” parameter in the kubelet startup parameters to specify the directory where kubelet monitors the configuration files. Kubelet will periodically scan this directory and create Pods based on the *.yaml or *.json files in this directory.
Deploying Static Pods:
- Choose a node to run the static pod.
[root@docker ~] $ ssh master
- Choose a directory, for example, /etc/kubelet.d, and place the pod definition file for the web server in this directory, for example, /etc/kubelet.d/static-web.yaml:
[root@my-node1 ~] $ mkdir /etc/kubelet.d/
[root@my-node1 ~] $ cat <<EOF >/etc/kubelet.d/static-web.yaml
apiVersion: v1
kind: Pod
metadata:
  name: static-web
  labels:
    role: myrole
spec:
  containers:
    - name: web
      image: nginx
      ports:
        - name: web
          containerPort: 80
          protocol: TCP
EOF
- Configure kubelet on the node to use this directory. Add the –pod-manifest-path=/etc/kubelet.d/ parameter when starting kubelet. If using Fedora system, add the following line to the Kubelet configuration file /etc/kubernetes/kubelet:
...
KUBELET_ARGS="--cluster-dns=10.254.0.10 --cluster-domain=kube.local --pod-manifest-path=/etc/kubelet.d/"
...
- Restart kubelet.
[root@docker ~] systemctl restart kubelet
Note: Since Pods cannot be managed directly through the API Server, an attempt by the Master node to delete this Pod will cause its status to become Pending and it will not be deleted.
- HTTP Method: This is not covered here, but those interested can refer to the official documentation at https://kubernetes.io/cn/docs/tasks/administer-cluster/static-pod/
Endpoint:
The combination of the Pod’s IP and the container port forms a new concept called the “Endpoint,” representing the external communication address of a service process within this Pod. A Pod can have multiple Endpoints. For example, when defining Tomcat as a Pod, we can expose both the port and service port as two Endpoints.
Event:
An Event is a record of an event, including the earliest generation time, the last recurrence time, the number of repetitions, the initiator, the type, and the cause of the event. Events are typically associated with specific resources and are important references for troubleshooting. Node description information includes Events, and Pods also have Event records.
When we encounter a situation where a Pod cannot be created, we can use kubectl describe pod [Pod Name] to locate the problem.
Demonstration:
$ Use kubectl get pod to see the current number of Pods.
[root@master ~]# kubectl get pod
NAME READY STATUS RESTARTS AGE
nginx-deployment-5c6b9976cc-2qbkr 0/1 ContainerCreating 0 14s
nginx-deployment-5c6b9976cc-bqtvp 0/1 ContainerCreating 0 14s
nginx-deployment-5c6b9976cc-ttdrz 0/1 ContainerCreating 0 14s
$ Use kubectl describe pod [Pod Name] to see detailed information about the Pod.
[root@master ~]# kubectl describe pod nginx-deployment-5c6b9976cc-2qbkr
Events:
Type Reason Age From Message
Normal Scheduled 35s default-scheduler Successfully assigned default/nginx-deployment-5c6b9976cc-2qbkr to master
Warning FailedCreatePodSandBox 6s (x2 over 28s) kubelet, master Failed create pod sandbox: rpc error: code = Unknown desc = failed pulling image "gcr.io/google_containers/pause-amd64:3.0": Error response from daemon: Get https://gcr.io/v1/_ping: dial tcp 74.125.203.82:443: getsockopt: connection timed out
A complete Pod created without errors is shown below:
$ show a complete pod
[root@master ~]# kubectl describe pod tomcat-6755d5587c-nfjst
Name:           tomcat-6755d5587c-nfjst
Namespace:      default
Node:           master/192.168.60.24
Start Time:     Wed, 18 Jul 2018 16:29:37 +0800
Labels:         app=docker
                pod-template-hash=2311811437
Annotations:    <none>
Status:         Running
IP:             172.17.0.2
Controlled By:  ReplicaSet/tomcat-6755d5587c
Containers:
  tomcat:
    Container ID:   docker://415acd35b6d4ed3effd26e2d9a958a56e83619243b0216690e0573a6c079bf1f
    Image:          daocloud.io/library/tomcat
    Image ID:       docker-pullable://daocloud.io/library/tomcat@sha256:1c39cc2e882b4169199888
    Port:           80/TCP
    Host Port:      0/TCP
    State:          Running
      Started:      Wed, 18 Jul 2018 16:33:18 +0800
    Ready:          True
    Restart Count:  0
    Environment:    <none>
    Mounts:
      /var/run/secrets/kubernetes.io/serviceaccount from default-token-cbkfr (ro)
Conditions:
  Type              Status
  Initialized       True
  Ready             True
  ContainersReady   True
  PodScheduled      True
Volumes:
  default-token-cbkfr:
    Type:        Secret (a volume populated by a Secret)
    SecretName:  default-token-cbkfr
    Optional:    false
QoS Class:       BestEffort
Node-Selectors:  <none>
Tolerations:     <none>
Events:          <none>
Pod Basic Usage
The basic usage of a Pod is that it can create one or more container combinations.
Create a pod named app=nginx
apiVersion: apps/v1beta2
kind: Deployment
metadata:
  name: nginx-deployment
spec:
  replicas: 5
  selector:
    matchLabels:
      app: nginx
  template:
    metadata:
      labels:
        app: nginx
    spec:
      containers:
      - name: nginx   ##container name
        image: daocloud.io/library/nginx:1.13.0-alpine  #container image address
        imagePullPolicy: IfNotPresent
        ports:
        - containerPort: 80
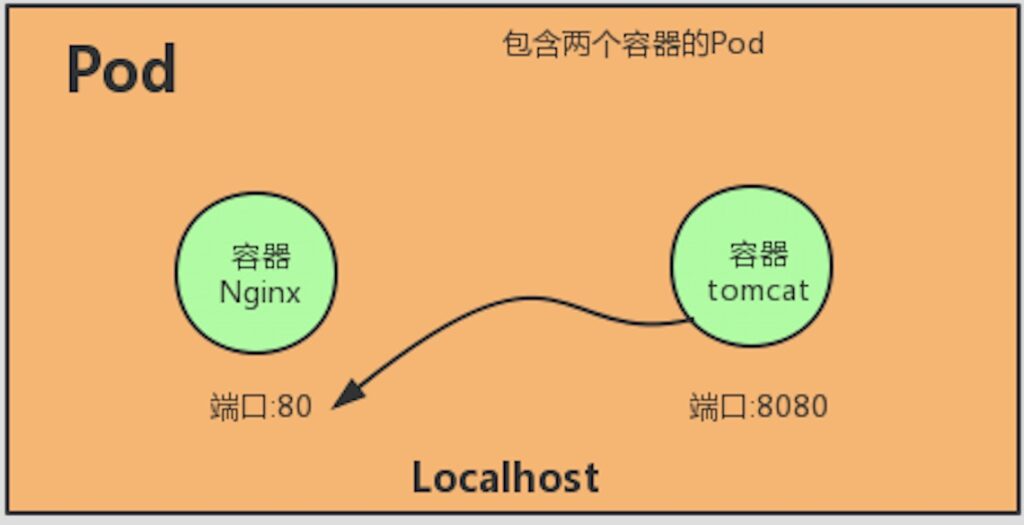
In another scenario, when the nginx container and the tomcat container are tightly coupled and should be packaged as a whole to provide services externally, these two containers should be packaged into one Pod.
Configure the nginx and tomcat yaml files as follows:
[root@master test]# cat docker.yaml
apiVersion: apps/v1beta2
kind: Deployment
metadata:
name: docker-pod
spec:
replicas: 1
selector:
matchLabels:
app: test
template:
metadata:
labels:
app: test
spec:
containers:
- name: docker-nginx-docker
image: daocloud.io/library/nginx:1.13.0-alpine
imagePullPolicy: IfNotPresent
ports:
- containerPort: 80
- name: docker-tomcat-docker
image: daocloud.io/library/tomcat:8.5.21-jre8-alpine
imagePullPolicy: IfNotPresent
ports:
- containerPort: 8080
[root@master test]# kubectl create -f docker.yaml
Parameter explanation
Check the running status of the Pod.
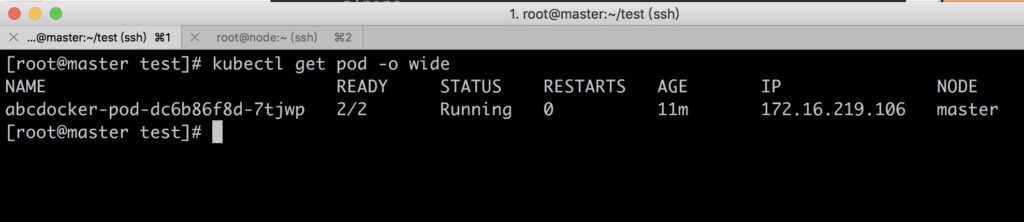
We can see that the READY information is 2/2, indicating that the two containers in the Pod are running successfully (Status: Running).
We can check the containers on Docker.
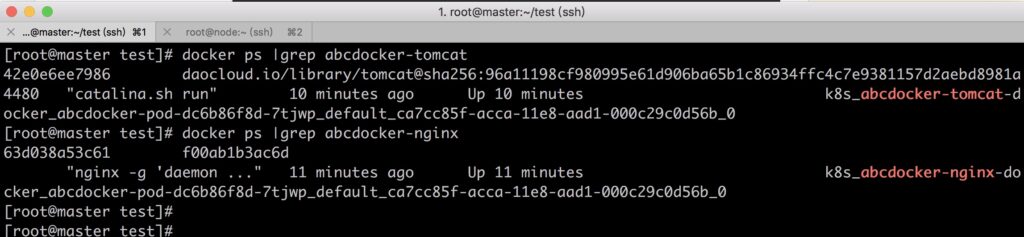
To view detailed information about the Pod, we can see the definitions of the two containers and the creation process. Event information event.
[root@master ~]# kubectl describe pod docker-pod-dc6b86f8d-7tjwp
Name:           docker-pod-dc6b86f8d-7tjwp
Namespace:      default
Node:           master/192.168.60.24
Start Time:     Fri, 31 Aug 2018 11:06:02 +0800
Labels:         app=test
                pod-template-hash=872642948
Annotations:    <none>
Status:         Running
IP:             172.16.219.106
Controlled By:  ReplicaSet/docker-pod-dc6b86f8d
Containers:
  docker-nginx-docker:  ## container name
    Container ID:   docker://63d038a53c613e0dfdb62df957035f0ab54cc5428461c33f9cbcee0118815619
    Image:          daocloud.io/library/nginx:1.13.0-alpine   ##container image name
    Image ID:       docker-pullable://daocloud.io/library/nginx@sha256:5c36f962c506c379bd63884976489c9c5e700c1496a6e8ea13dc404b1d258f76
    Port:           80/TCP
    Host Port:      0/TCP
    State:          Running
      Started:      Fri, 31 Aug 2018 11:06:17 +0800
    Ready:          True
    Restart Count:  0
    Environment:    <none>
    Mounts:
      /var/run/secrets/kubernetes.io/serviceaccount from default-token-c6m5g (ro)
  docker-tomcat-docker:
    Container ID:   docker://42e0e6ee79860c5dac6a9103c549bd47422e8044f2c57046f6ad4dcca346f743
    Image:          daocloud.io/library/tomcat:8.5.21-jre8-alpine
    Image ID:       docker-pullable://daocloud.io/library/tomcat@sha256:96a11198cf980995e61d906ba65b1c86934ffc4c7e9381157d2aebd8981a4480
    Port:           8080/TCP
    Host Port:      0/TCP
    State:          Running
      Started:      Fri, 31 Aug 2018 11:07:20 +0800
    Ready:          True
    Restart Count:  0
    Environment:    <none>
    Mounts:
      /var/run/secrets/kubernetes.io/serviceaccount from default-token-c6m5g (ro)
Conditions:
  Type              Status
  Initialized       True
  Ready             True
  ContainersReady   True
  PodScheduled      True
Volumes:
  default-token-c6m5g:
    Type:        Secret (a volume populated by a Secret)
    SecretName:  default-token-c6m5g
    Optional:    false
QoS Class:       BestEffort
Node-Selectors:  <none>
Tolerations:     <none>
Events:          <none>
ConfigMap for Pod Configuration Management
A best practice in application deployment is to separate the configuration information required by the application from the program itself. This allows for better reuse of the application and flexible functionality through different configurations. After packaging the application as a container image, configuration can be injected into the container during creation through environment variables or mounted files. However, in large-scale container clusters, configuring multiple containers with different configurations can become complex. Kubernetes introduced a unified application configuration management solution starting from version 1.2, known as ConfigMap (a resource object).
Overview of ConfigMap
ConfigMap is typically used by containers in the following ways:
- Generating environment variables inside the container.
- Setting startup parameters for the container’s startup command (needs to be set as environment variables).
- Mounting as a volume inside the container for files or directories.
ConfigMap stores one or more key-value pairs in the Kubernetes system for application use. It can represent the value of a variable (e.g., apploglevel=info) or the content of a complete configuration file (server.xml=<?xml..>..).
ConfigMap can be created using a YAML configuration file or directly using kubectl create configmap.
Creating ConfigMap
There are four ways to create a ConfigMap:
- Directly specifying ConfigMap parameters in the command line, using
--from-literal. - Specifying a file to create a ConfigMap, using
--from-file=<file>. - Specifying a directory to create a ConfigMap from all the configuration files in the directory, using
--from-file=<directory>. - Preparing a standard YAML file for ConfigMap and then using
kubectl create -fto create it.
1. Creating ConfigMap Using YAML File
apiVersion: v1
kind: ConfigMap
metadata:
  name: test-configmap
data:
  key1: docker1
  keydir: /var/data
Explanation:
name: Name of the ConfigMap.data.key1: Value corresponding to thekey1.data.keydir: Mount directory corresponding tokeydir.
After creating and verifying the ConfigMap, you can use it within a Pod.
2. Creating ConfigMap Using --from-file Parameter
kubectl create configmap test-server.xml --from-file=server.xml
This command creates a ConfigMap named test-server.xml using the content of the file server.xml.
3. Creating ConfigMap Using --from-literal Parameter
kubectl create configmap test-configmap --from-literal=loglevel=info --from-literal=appdatadir=/var/data
This command creates a ConfigMap named test-configmap with the specified literals loglevel=info and appdatadir=/var/data.
Using ConfigMap in Pods
(1) Using ConfigMap via Environment Variables
First, create a ConfigMap:
apiVersion: v1
kind: ConfigMap
metadata:
  name: docker-configmap
data:
  keyinfo: www.docker.com
  dockerDir: /var/data
Then, create a Pod referencing the ConfigMap:
apiVersion: v1
kind: Pod
metadata:
  name: docker-pod
spec:
  containers:
    - name: configmap-pod
      image: busybox
      command: [ "/bin/sh", "-c", "env | grep config" ]
      env:
        - name: configmapPod
          valueFrom:
            configMapKeyRef:
              name: docker-configmap
              key: keyinfo
        - name: configmapDir
          valueFrom:
            configMapKeyRef:
              name: docker-configmap
              key: dockerDir
  restartPolicy: Never
This Pod will have environment variables configmapPod and configmapDir populated with the values from the ConfigMap.
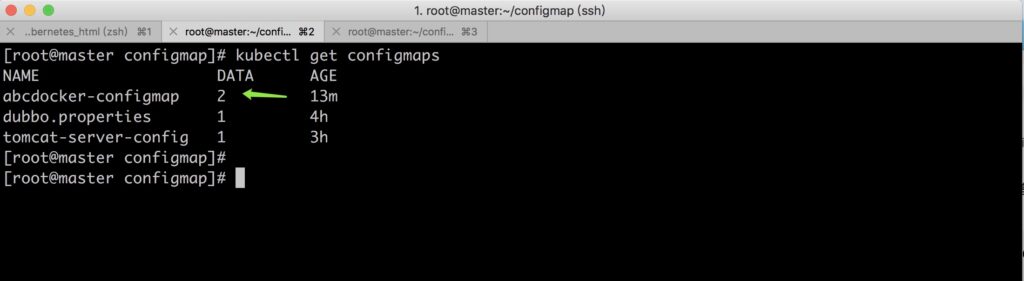
Get the configmaps detail.
(2) Using ConfigMap via VolumeMount
Create a ConfigMap with a configuration file, for example, server.xml.
apiVersion: v1
kind: ConfigMap
metadata:
  name: tomcat-server-config
data:
  server.xml: |
    <?xml version='1.0' encoding='utf-8'?>
    <Server port="8005" shutdown="SHUTDOWN">
      <!-- Configuration for Tomcat Server -->
      <!-- ... -->
    </Server>
Then, reference this ConfigMap in a Pod:
apiVersion: apps/v1
kind: Deployment
metadata:
  name: docker-pod
spec:
  replicas: 1
  selector:
    matchLabels:
      app: tomcat
  template:
    metadata:
      labels:
        app: tomcat
    spec:
      containers:
      - image: busybox
        name: tomcatpod
        volumeMounts:
        - mountPath: /tmp/server.xml
          name: serverxml
          subPath: server.xml
        ports:
        - containerPort: 8080
        command: ["tail", "-f", "/dev/null"]
      volumes:
      - name: serverxml
        configMap:
          name: tomcat-server-config
          items:
          - key: server.xml
            path: server.xml
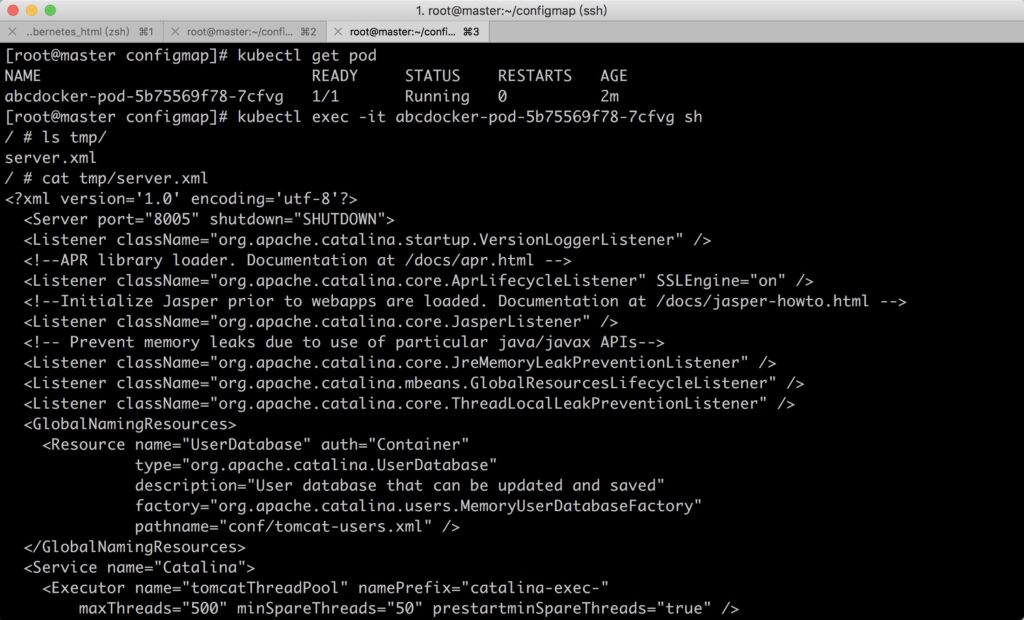
This Pod will have the server.xml file from the ConfigMap mounted at /tmp/server.xml inside the container.
We can check ths server.xml file in the /temp direcroty.
ConfigMaps offer flexibility in managing configuration data for applications running in Kubernetes clusters, allowing for easy updates and reuse.
Summary of ConfigMap Usage
The limitations and considerations when using ConfigMap are as follows:
- ConfigMap must be created before Pods.
- ConfigMap is namespace-bound; only Pods within the same namespace can reference it.
- Quota management within ConfigMap is not yet implemented.
- Kubelet can only support Pods managed by the API Server to use ConfigMap. Static Pods created automatically on this node via
--manifest-urlor--configby Kubelet cannot reference ConfigMap. - When mounting ConfigMap in Pods using volumeMount, only directories can be mounted inside the container, not files. After mounting into the container, the directory will contain each item defined in ConfigMap. If the directory originally contains other files, they will be overridden by the ConfigMap mounted. If the application needs to retain the original files, additional handling is required. ConfigMap can be mounted to a temporary directory inside the container, and then configuration files can be copied or linked to the actual configuration directory used by the application through a startup script (e.g.,
cp link). - It’s essential to note that containers cannot just mount the volume; a command needs to be executed to keep the container running in the foreground.
- SubPath needs to be added during mounting; otherwise, the entire directory will be replaced.